Nowadays, having an internet presence is everything. A lot of things are being done online now, whether it may be for business, for leisure, for essential tasks, or simply to pass the time. According to Statista, a whopping 4.57 billion people around the world actively use the internet. That’s 59% of the world’s population!
A great way to establish an online presence is to create your own website. However, if building a website is too tedious or costly, you can always go for the next best thing — a Facebook Page.
Before we start the creation of your Facebook Page, let us first answer some commonly asked questions.
Why Facebook?
Why choose Facebook and not other social media platforms? There are four main reasons.
First, Facebook is the most popular social networking site. As of July 2020, it outranked all other social media platforms by having 2.6 billion active users worldwide. If you want to create a page, start in a place where you can easily find an audience. With this number of active users, you are bound to generate interest.
Second, Facebook pages appear in search engine results. This is great if you want your customers to find and contact you, especially if you don’t have a website.
Third, Facebook is available for free.
Finally, creating a Facebook business page is as easy as a pie. If you already have a personal Facebook account, then that’s even better!
Who can create a Facebook Page?
Anyone! As long as you have a personal Facebook account, you can create a page. There is no limit to how many pages you can create and manage. The only limit you’ll encounter is your ability to actually manage them, which is what FPTraffic is trying to solve for you.
What Type of Facebook Page Can I Create?
There are hundreds of categories your Facebook page can fall under. You can find a complete list of them here. Your page doesn’t have to represent a business; it can also be about a hobby, a community, a fan page, and more.
You can create almost any type of page, as long as it follows community standards. If your page does not adhere to the community standards, it can get taken down, no matter how huge the following. Remember this in the course of managing your page.
Steps to Creating a Facebook Page
Now let’s get down to the nitty-gritty details of building your very first Facebook page.
Step 1. Create a Page
Login to your personal Facebook account, then click on the “Create” button located at the upper right portion of the page.
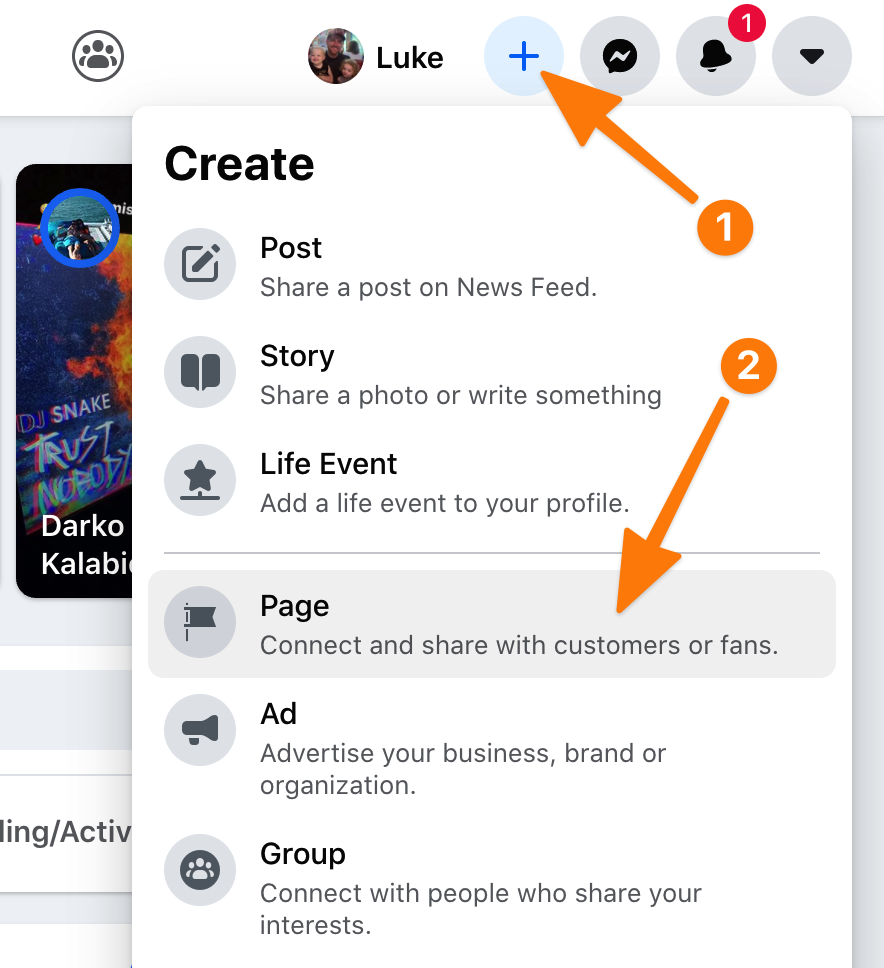
If you can’t find it, click here instead.
Choose a Classification
You will be taken to a page that asks you the type of page you want to create. There are two main classifications to choose from, and these are (1) Business or Brand, and (2) Community or Public Figure.
If you are creating a page for your company, business, product, service, agency, brand, or any entity that you actually represent, then choose Business or Brand.
But if you are creating a page that is for a certain interest (hobbies, shows, etc.), an organization, a fan page, or any other non-business places or causes, then choose Community or Public Figure.
Enter Your Intended Facebook Page Name
Once you choose the classification, you will then be asked for the Page Name. This is where it gets tricky. You have to know what name you plan on using to represent your page because once you assign a page name, changing it later on can be challenging. Facebook will have to assess whether the new name represents the old/current Facebook page, and the change may or may not be approved.
Related article: How to choose a name for your Facebook Page
Choose a Category
If you have already settled on a Facebook name, choose the category from the drop-down menu. Depending on the category you chose, you would either be shown just the “Continue” button or will be asked to fill out the address and phone number (optional) before moving forward.
Step 2. Upload Images
After clicking on the Continue button, you will then be taken to a new page that asks for a profile picture. This picture will represent your page; however, there is no need to worry too much about this as the profile and cover pictures can easily be changed once the page has been completely built.
The image dimension does not matter too much, but keep in mind that Facebook displays your profile picture in the following sizes:
- 170×170 pixels on computers,
- 128×128 pixels on smartphones.
If you want the image to look properly proportioned, it would be better to upload a square one. You will also be given the option to crop the image as you like.
After uploading a profile picture (or skipping that step), you will then be asked to upload a Facebook cover photo. This is a rectangular image that serves as your page header.
The minimum image size you can upload is 399×150 pixels. However, the image will be stretched to fit the space, depending on the device being used by the visitor. The banner is resized to 820×312 pixels for PCs, and 640×360 pixels for smartphones.
Since the size is tricky, it would be best to use templates from graphic design tools online, such as Canva. The Facebook cover templates they have consider the optimum size of the image as well as the visible spaces, no matter the device.
But of course, you can always skip that part and upload a cover photo later.
Step 3. Improve the Page
If you have reached this step, Congratulations! Your Facebook Page is now live. However, it is still a blank slate. As this is social media, you have to prevent this space from looking socially awkward.
Edit Page Info and Templates
First things first, visit your Page Settings (can be found on the upper right section), then go to the Page Info tab located on the menu on the left.
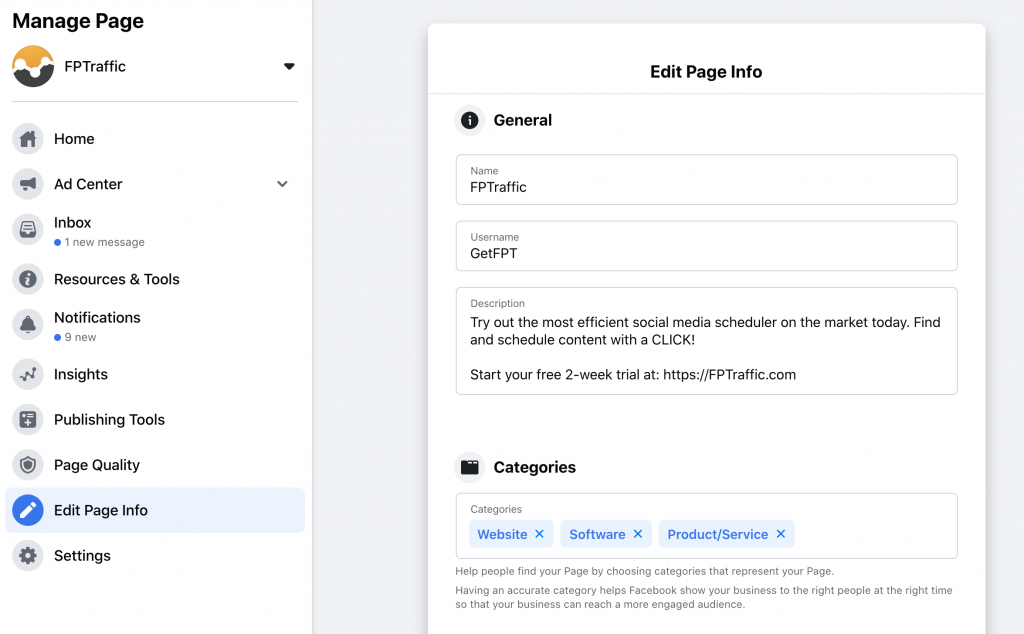
This is where you add more information about your page. The more information you provide, the easier for users to find your page.
Next, head over to Templates and Tabs (located on the left menu). This is where you edit what your audience can see on your page. There are multiple templates available, depending on the goal of your page. All of these templates are customizable, so hiding, rearranging, and adding tabs is possible.
Once done, you can go back to the main page; other page settings can be edited later.
Add Username
Your page’s username is followed by the symbol @. This makes it easier for your viewers to find your page. Make sure this is as close to your Facebook Page Name as possible. This can be edited later, but will again be subject for approval.
Add a Button
Under your Facebook cover photo is a button that will help viewers perform your desired action. It basically acts as a CTA. If you do not change this, no button will be shown on your page.
There are six basic functions for the button, and these allow your visitors to:
- Book
- Contact
- Learn more
- Shop
- Download or Play
- Follow
This button is editable, so you can always adjust it the moment you change your goal.
Step 4. Gain Followers
Your page is now complete and socially-acceptable! It’s time to gather followers.
Facebook encourages you to invite your friends to like your page as they are already the ones you are in contact with, are within your circle, and would likely be interested in your page.
To make it easier for you to do this, a list of your friends will be displayed on the right sidebar of the page. You can also manually invite by clicking on the ellipsis button (three dots) under the cover photo, and choosing the “Invite Friends” option.
Your first goal is to hit the first 10 likes.

But what if you have no friends on Facebook, and you just created your personal account to create a business account? You have two options.
Copy the URL of your FB page and share it elsewhere.
If you have other platforms (whether online or offline), you can share your Facebook page and encourage others to like or follow.
Related article: Using Your Facebook Personal Profile to Boost Your Facebook Page
Run a Facebook promotion of your page to get likes.
Do you have the budget and would want to gain followers quickly? Then this is the way to go. If you have run any form of advertising before, this will not be too difficult. You can get thousands of followers in a matter of hours or days, depending on your strategy.
You’ve Only Just Begun
The easy part is over, now the hard part has just begun.
Creating an FB Page is actually pretty simple and can be done in a matter of minutes. It’s managing a page that’s challenging. It’s the regular posting and eternal search for new content that will prove to be difficult. That’s where we can help. Join FPTraffic today and start growing your new Facebook Page!




Do you provide content , schedule post on page and website ? NEED TO GET PAID FOR PEOPLES CLICKS . THANKS
Our Content Finder will help you find content that you can get paid a commission for, but we do not specifically help you monetize by getting paid per click.