You’ve finally managed to create your own Facebook Page. What’s left is to post content, gain lots and lots of followers, and make money out of it! If it sounds too good to be true, it’s because it is!
While some pages have the capacity to gain thousands of followers overnight, we’re not all that lucky. Instead of waiting for luck to turn your way, it’s best to do something about it. If you want to get thousands of “Likes” or followers in a matter of days or weeks, then you better start promoting your page.
You can manually promote your page by sharing it through your personal profile over and over. You can also promote it through other social media networks, email newsletters, websites, and more. However, even with these methods, you can’t expect your page to grow really fast. The fastest way, therefore, is to use Facebook Ads.
But how exactly do you use Facebook Advertising to promote your business or fan page to get more likes?
There are actually two ways to promote your page to get more likes, and that is by:
- Going directly to your ad account and setting up an ad campaign; or
- Promoting straight from your Facebook Page.
3 In-Depth Steps to Create a Facebook Like Ad Through the Ads Manager
You can use your personal ad account for this, but then, we recommend creating a business account for this purpose. A Business Manager allows you to not only manage your ad account, but also your Facebook Pages. You can add editors, ad managers, and other team members to it. Most importantly, you can dive deeper into the stats of your campaign and you’d have access to other ad options.
However, it’s still up to you whether you want to use a personal ad account or an ad account within a business manager.
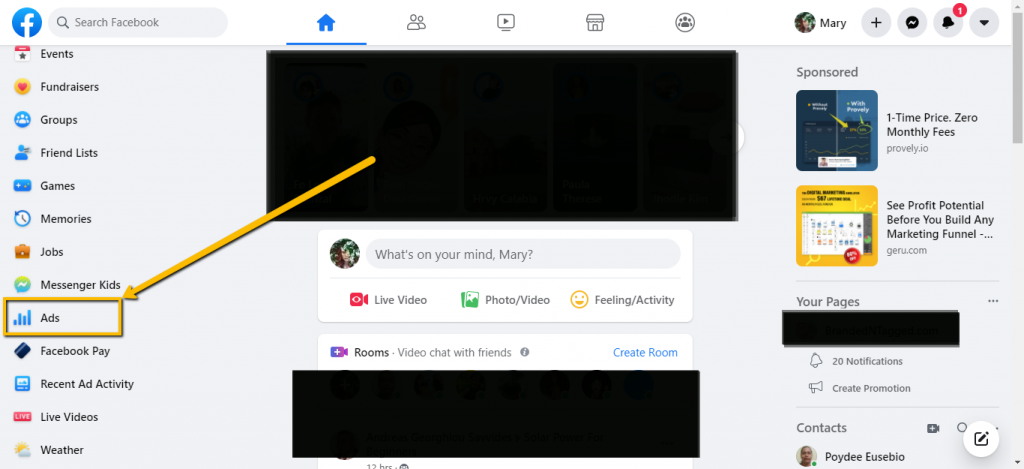
Step 1. Click On The Ads Link On Your Personal Profile.
If you’re using the new Facebook theme, then this link can be found on the left pane of your news feed page. Simply scroll down to find the ADS link.
If you’re using the classic theme, you can find the Manage Ads link when you click on the arrow down button on the upper right corner of the page.
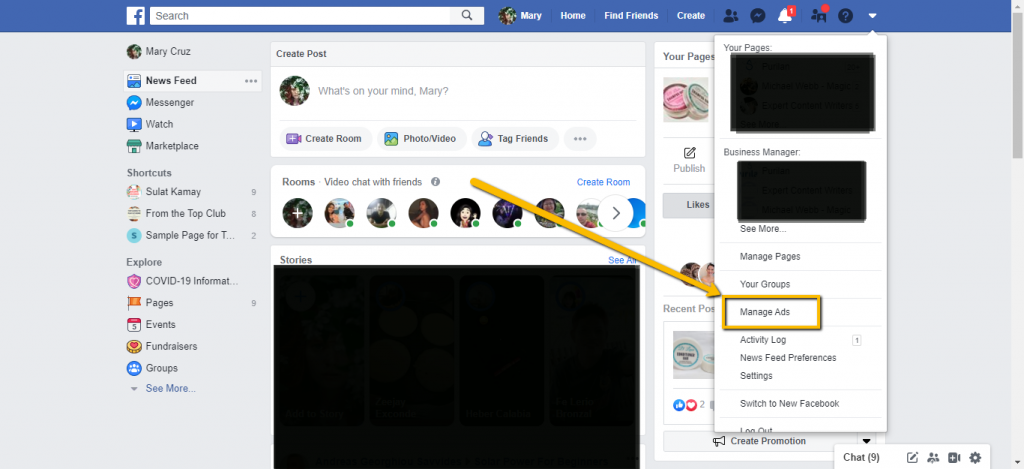
If you have a Business Manager, click on the name of the business account on the same drop down menu.
Whether you are using the classic theme or the new Facebook theme, the ads manager that will open up will look the same.
Now, if it is your first time to click on the Ads link, you will first be asked to set-up your ad account. Your default ad account will go under your Facebook name. You will be asked for the Time Zone (which is the time zone you want to view your campaigns in) and the Currency (which is the currency you will be charged in).
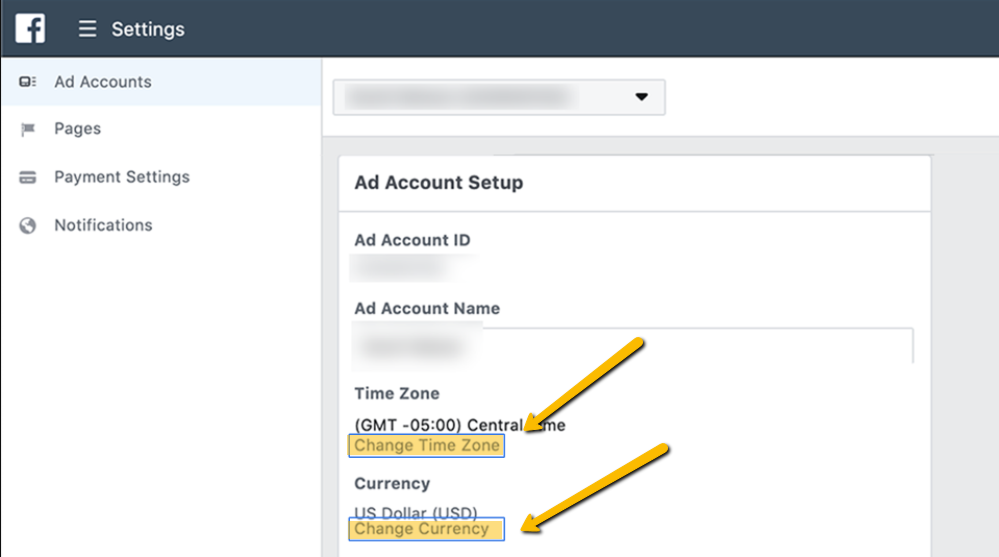
If you are using a personal ad account, those are all you need to adjust.
If you are setting up an ad account in a business manager though, you will be asked for additional business information. These are as follows:
- Advertising purpose
- Business name
- Business address
- Business country
- Tax ID Number
- If you are an ad agency
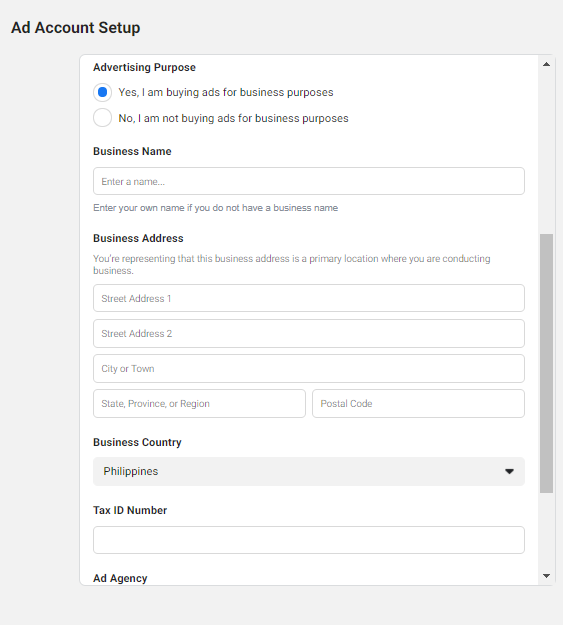
Now it’s up to you whether you want to fill these out now or at a later date, as you have the option to skip it. Keep in mind though that the less information you provide Facebook, the more dubious your business would seem to them.
If you want to ensure Facebook that you are a legitimate business, fill the information out properly in due time.
You will also be asked to add your Billing option. Facebook works on a post-payment basis, which means you will only pay once your ads have run. You have the option to use a credit card or to connect a PayPal account.
Step 2. Create a Campaign.
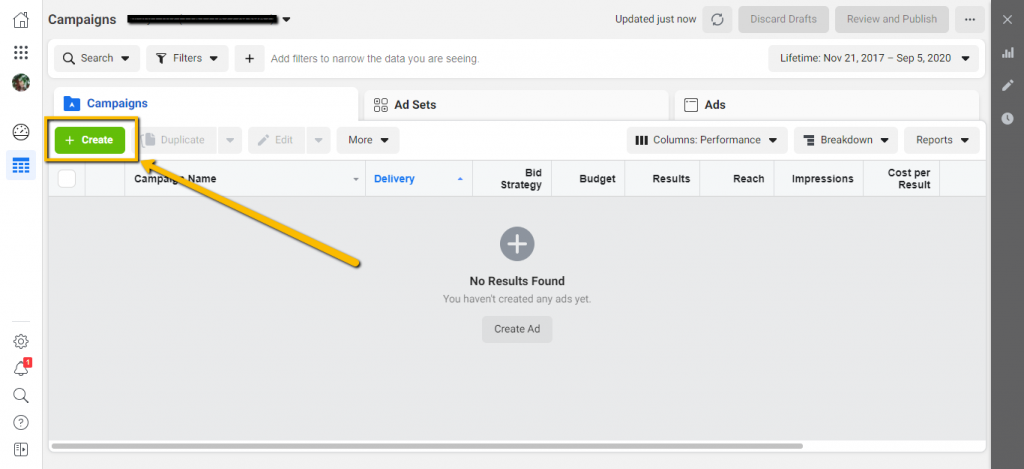
Once you are done setting up your ad account, either a campaign creation page will open up for you, or you will be shown the Ads Manager dashboard. If the ad setup page did not appear automatically, simply click on the Create button on the upper left portion of the screen.
Step 2-a. Choose a Campaign Objective.
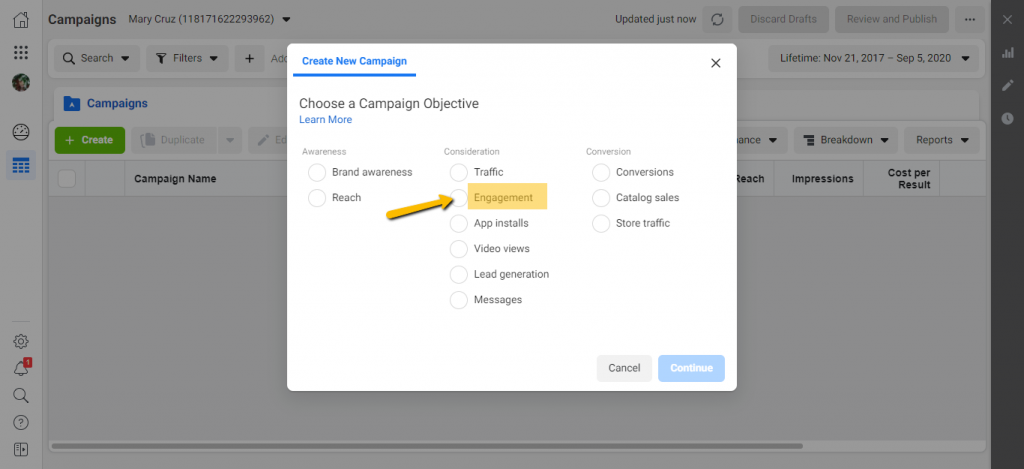
Remember, the goal here is to gain more followers, so choose the Engagement Campaign Objective. This objective type helps you get more post engagements (such as clicks, reactions, shares and comments), event responses, and more importantly, Page Likes.
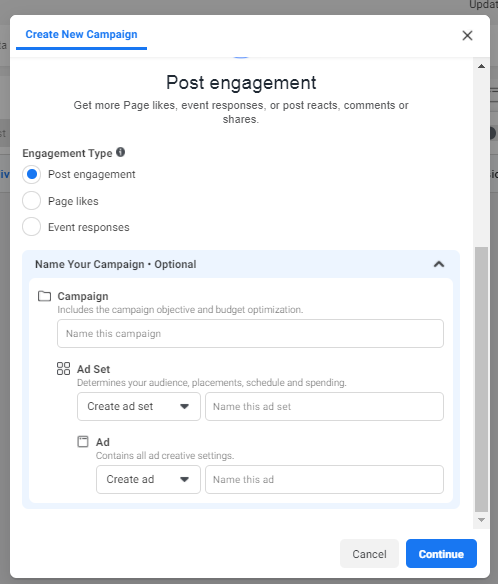
Once you click on the radio button for Engagement, you will then be asked for the Engagement Type. Choose Page Likes, or course.
Step 2-b. Name Your Campaign.
You then have the option to name your campaign. Although not required, it is a good practice to name your campaigns appropriately. Once done, click on the Continue button.
You will then be presented with the Campaign Settings page.
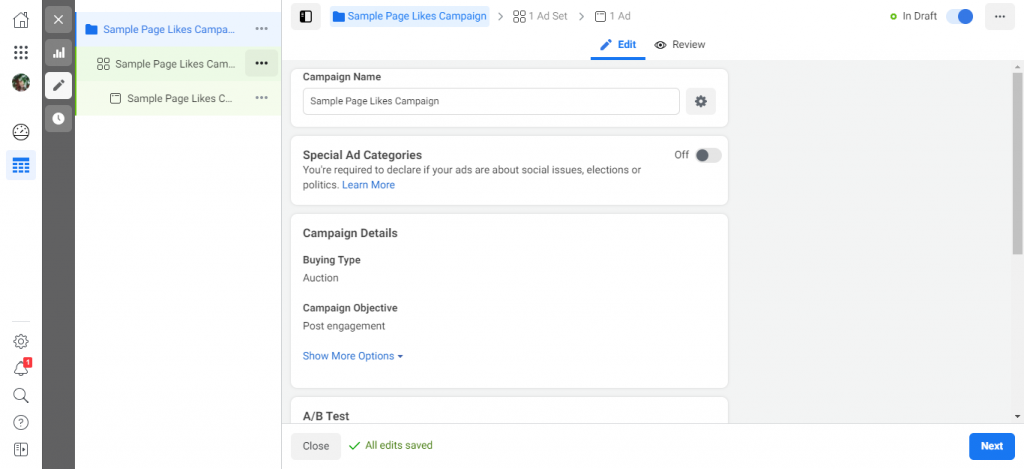
There is nothing much to change here except for the Campaign Budget Optimization option. Scroll down to the very bottom to see this setting.
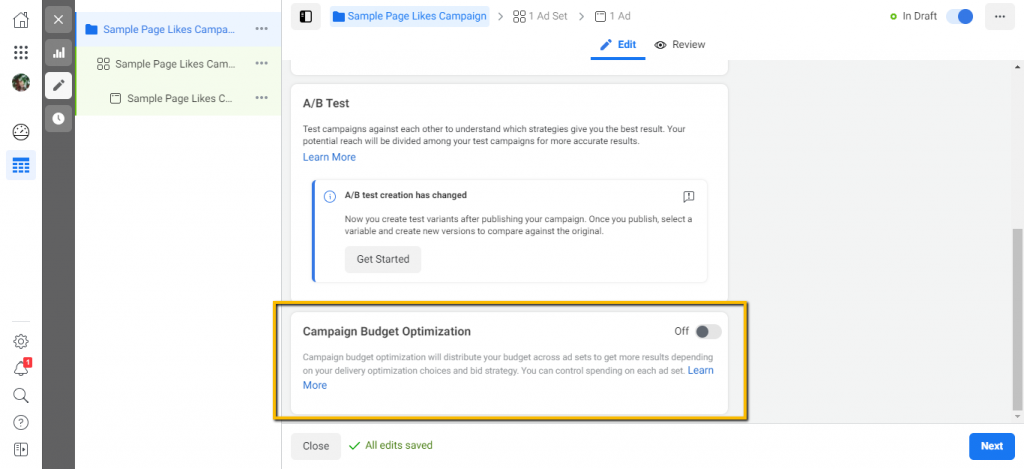
It is turned off by default, but you can turn it on, if you like. When turned on, your ads will run on a Campaign budget, meaning the budget will be split among the Ad Sets, with greater weight being assigned to the Ad Set that is performing well.
If you keep it turned off, the budget will run on an Ad Set level. This means the budget for each Ad Set will be based on what you manually place, whether the Ad Set is performing well or not is not important.
Step 2-c. Create an Ad Set.
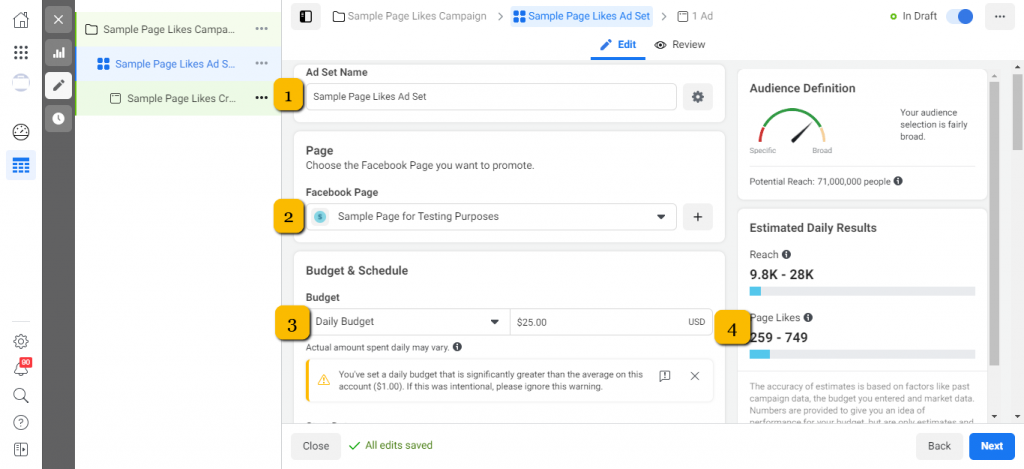
On the Ad Set creation page, make sure you name your ad set(1), if you haven’t already done so as indicated on Step 2-b.
Choose the Facebook Business or Fan Page you want to grow(2). If you only have one, it will show up by default.
Choose a budget type(3) and set your budget amount(4). You can choose between Lifetime Budget and Daily Budget.
Lifetime Budget
If you choose this, Facebook will evenly distribute the budget between your start and end dates. If for some reason the ad spent on one day does not match that of the expected distribution, Facebook’s algorithm will makeup for it the following day.
The minimum amount for Lifetime Budget is $1 for a 24-hour duration. So if you set your ads to run for 30 days, for example, then the minimum budget is $30.
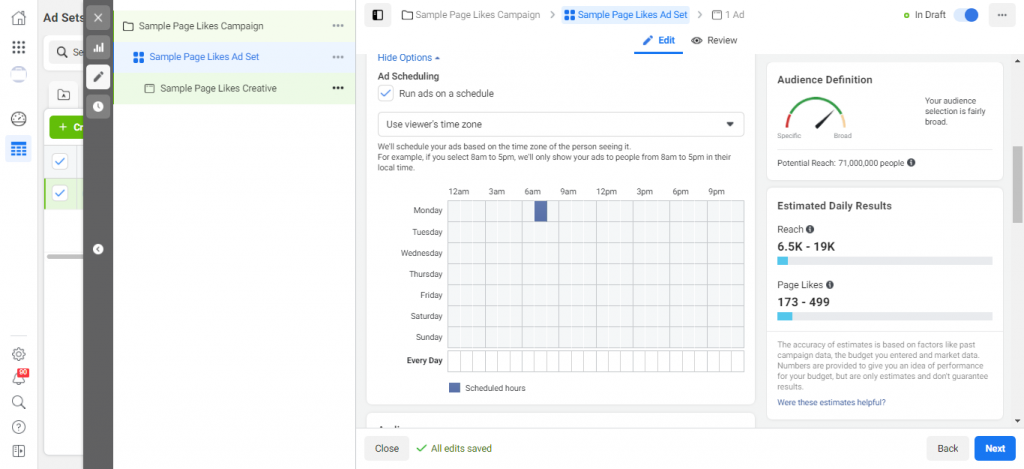
With this budget type, you have the option to set an Ad Schedule. This is highly useful if you know the day of the week and the time of day your target audience is likely online. If you don’t, then leave the option unchecked.
Daily Budget
If you choose the Daily Budget, the amount will also be spent on a regulated basis, but does not need to have an End date. It will simply keep on running until you turn the ad set or campaign off.
Step 2-d. Create an Audience
Although we are still in the Ad Set creation phase, this section needs to be highlighted as it is one of the driving forces of your Page Likes campaign.
Ignore the Saved Audiences and Custom Audiences at this point, since this is your first opportunity to actually create any of these. We’ll immediately jump to the next steps:
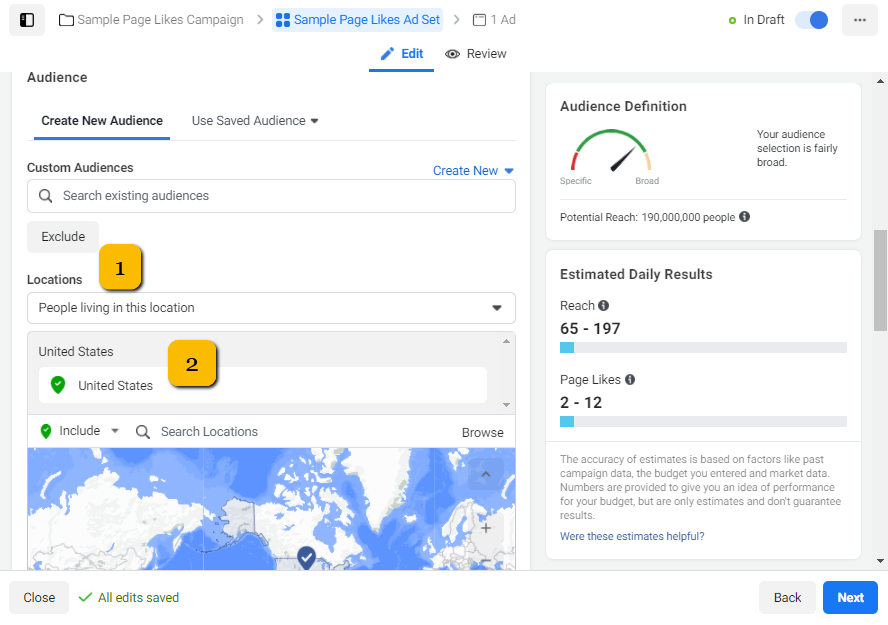
Locations. There are four targeting options here:
- People living in your chosen location,
- People who have recently been to this location (which are not there at the moment),
- People who are traveling to this location (currently in this location, but don’t live here), or
- A combination of the first two options.
The default chose is the first one.
Choose the actual location. You can either drop a pin and determine the radius, or simply type the area. You can target as widely as WorldWide, or you can target as narrowly as an exact address, with a minimum of one mile radius.
Age and Gender. Choose the age range you want to display ads to. The youngest you can target is 13, and the oldest is 65+. If you intend to earn from your Fan Page, make sure to target age 18 and above.
As for the Gender, you can choose All, just Men or just Women.
Detailed Targeting. This is where it gets interesting. You can target based on demographics, interests or behaviors. You have the option to exclude audiences based on similar targeting options as well.
Detailed Targeting Expansion is turned off by default, but you can turn it on. This option means you are giving Facebook the freedom to display your ad to viewers whom they think will likely respond positively to it. If you have a strict budget, keep this turned off.
All languages are included by default since you are targeting based on location anyway. But if you want to focus on people using a specific language, edit this option.
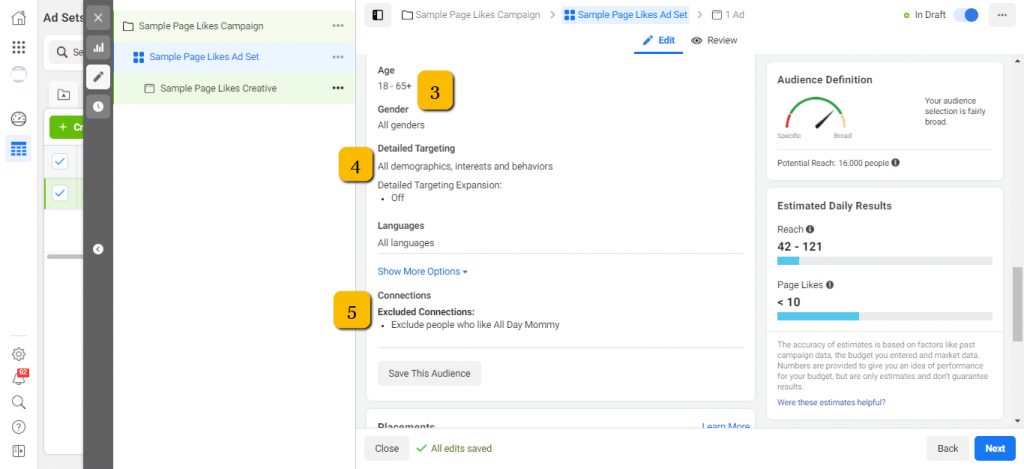
Exclude Connections. Since this is a campaign to generate more likes, it will not make sense to show it to people who have already liked your page. Choose “Exclude people who like your page”.
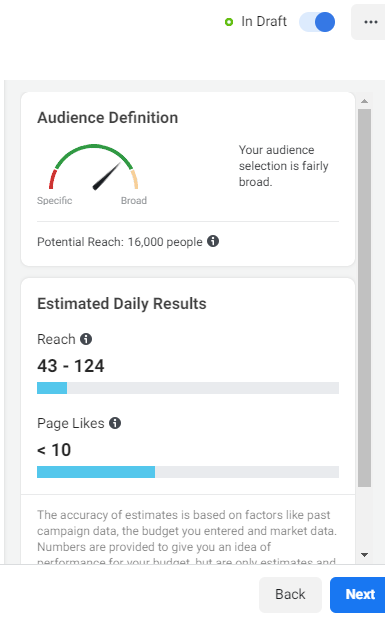
As you adjust the audience settings for your ad set, you will notice the meter on the right-most pane spring to life. This meter lets you know how many people you can potentially reach based on your targeting options. The lower the number, the more expensive each like would potentially become.
Underneath the meter is the Estimated Daily Results you’ll get based on your targeting and your budget.
Step 2-e. Finish creating the Ad Set.
The remaining parts are the Placement and Optimization & Delivery sections.
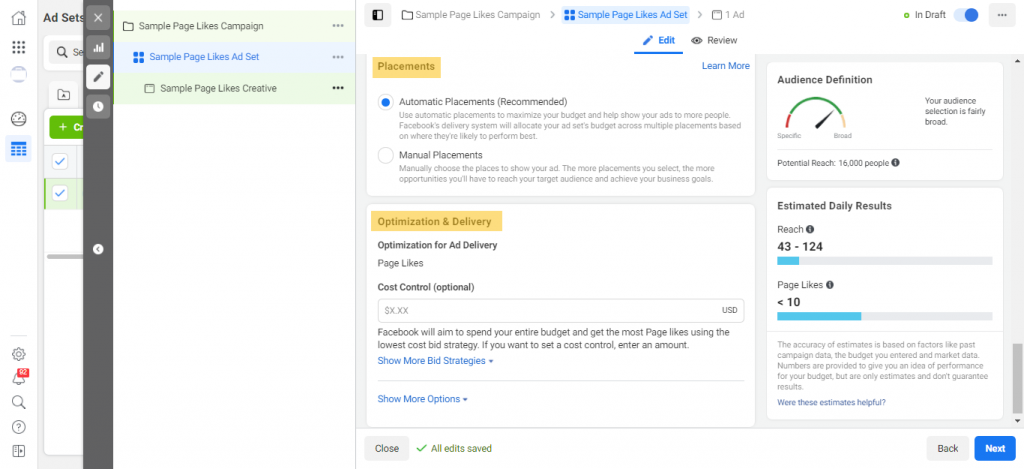
There are two options under Placement, the Automatic (default option) and Manual Placements. Since the objective of this campaign is to get page likes, there are only two placements allowed, and these are the Facebook News Feed and Facebook Marketplace.
As you have yet to know which of these placements will work for you, it’s best to leave it as is. (Although it’s highly likely that your ad will be shown more often in the News Feed).
Under Optimization & Delivery, you will be presented with an option to set Cost Control, which is actually the maximum amount you are willing to pay for every like. If you set a very low amount here, chances are you will not get any likes. Leave it blank to allow Facebook to optimize for you.
Step 3. Craft your Ad Creative.
First, name your creative if you still haven’t done so. Next, skip the Identity section and head straight for the Ad Creative section.
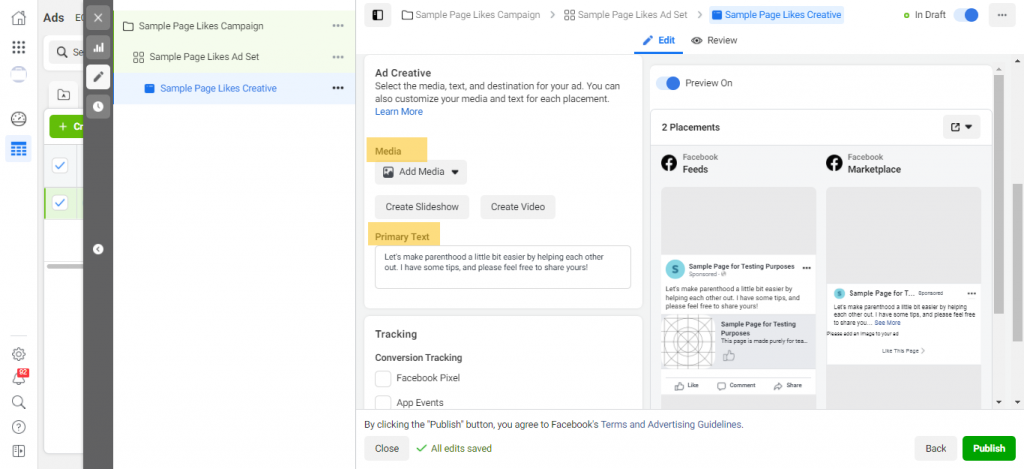
This is where you can work your magic. Add a media that best represents your page, may it be an image or a video. You can also upload several images and turn it into a slideshow.
The minimum image size is 254×133 pixels and must be using JPG or PNG format. The minimum video resolution is 120×120 pixels for square videos, and must use MOV and MP4 formats.
Since this is a Page Likes campaign, your ad text would be like the “About” section of your page, reduced to a few words. This is what your audience will see, so make sure it is captivating, without being clickbait-y. Facebook hates clickbait and will instantly reject your ad the moment is detects a hint of such practice.
You will see a preview of your ad on the right pane. Once you are satisfied, click on the Publish button at the bottom right corner.
Hurray! You’ve finally finished setting up a Facebook Likes Campaign!
The next step would be to sit back and wait for your ad to be approved. Remember that the moment your ad gets approved, it will immediately start running. If you don’t want this to happen, PAUSE the campaign. It will still be reviewed but will not automatically run after approval.
If you have already set-up your billing details at the beginning of the ad account creation, then you’re good to go. If not, you’ll be asked to set it up first before your campaign goes live.
6 Steps to Create a Facebook Likes Campaign Straight from your Facebook Page
Another way to run a Likes Campaign is through your Facebook Page. This may look simpler than what we did above, but that is just because we have deeply explained every aspect of campaign creation in the previous method. For similar steps, please refer to the previous guide for more details.
To go this route, here are the steps:
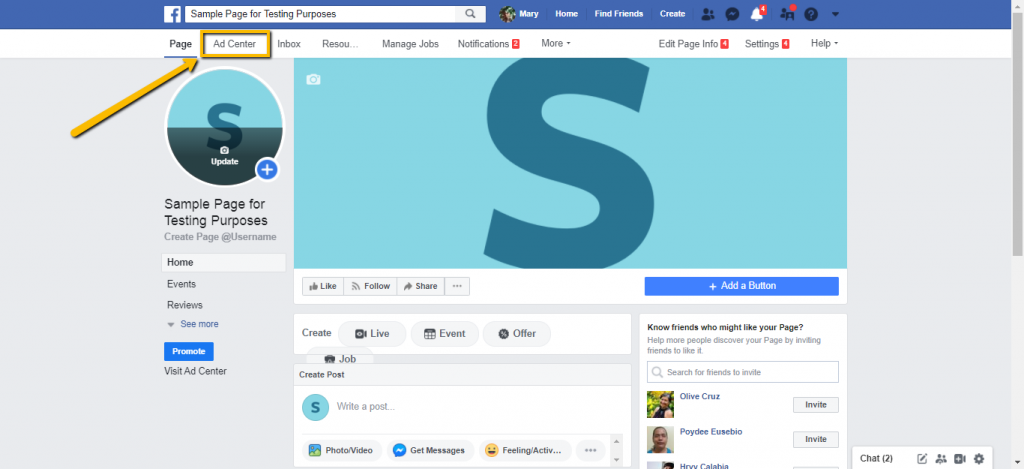
- Go to your Facebook Page and look at the tabs at the top row. Choose the Ad Center tab.
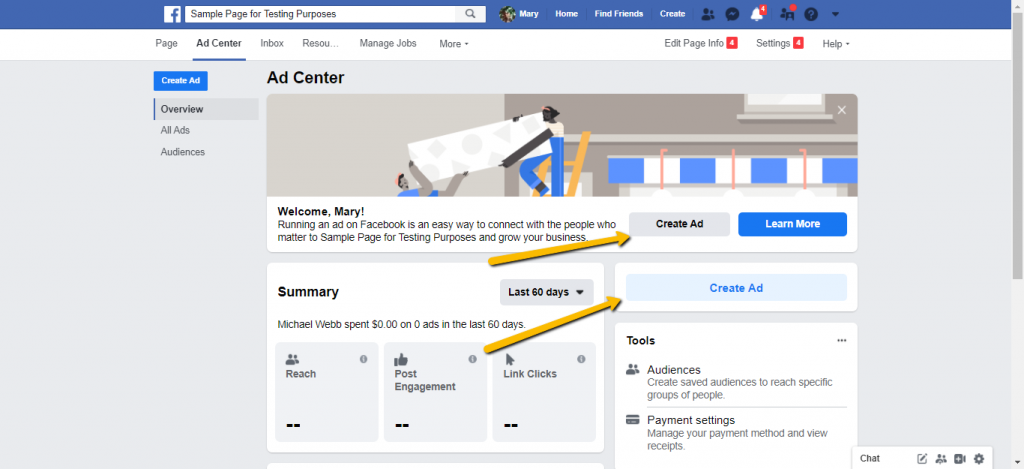
- Click on “Create Ad”. You will see two buttons for this. Choose any.
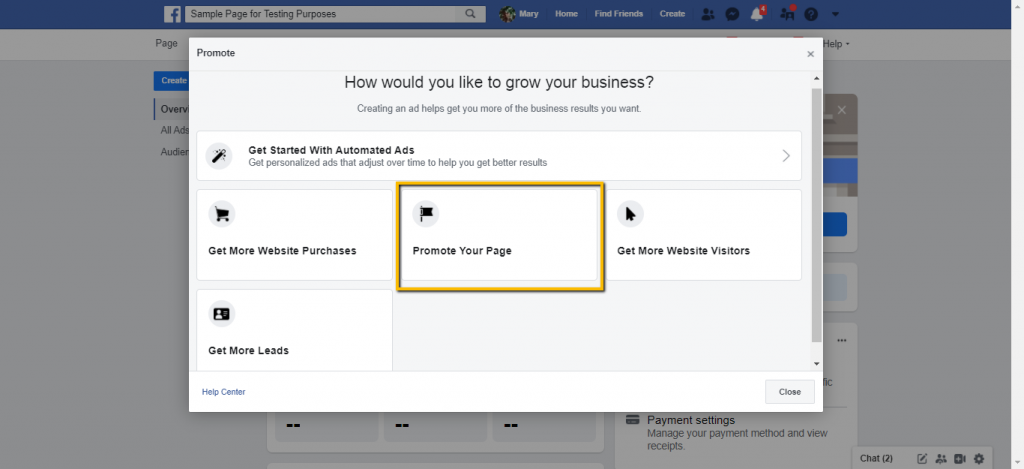
- Choose “Promote your Page”
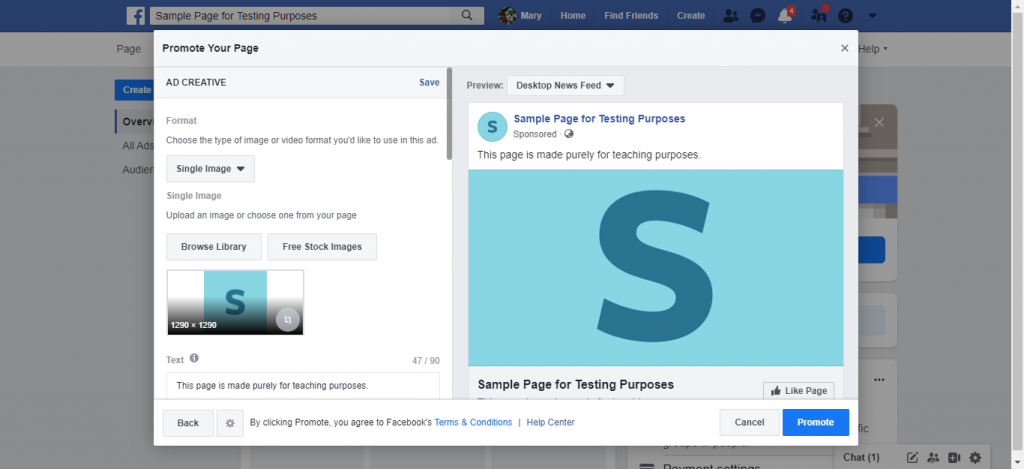
- Create your ad. This section is actually a simplified version of the steps followed when creating an ad using your ad manager. However, some parts have limited options.
- Choose the ad account for this ad. If you haven’t established a business manager yet, your default account would be your personal ad account.
- Fill-out your billing information once you are satisfied with the ad you have created. This ad will automatically run the moment it is approved.
If you want to link this ad to a Business Manager, make sure you set that up first before creating an ad from your Facebook Page.
Final Thoughts on Creating a Facebook Like Ad
Setting up a Facebook Ad may seem complicated at the beginning, but the more you work on it, the more confident you’ll be in using this platform. Keep in mind that you need to monitor your Facebook Page Likes campaign to make sure that it succeeds, and so that you don’t just burn money.
Once you gain enough traction, you will be able to gain followers easily and cheaply. What are you waiting for, set your ad up now!


Free like facebook